Taking screenshots is a significant feature that can assist you to debug plus troubleshoot problems with your test cases. Moreover, screenshots can offer a visual record of the state of a web page at a certain point in time, enabling one to easily identify problems & communicate them to other members.
Screenshot in Selenium
In Selenium Webdriver a Screenshot is utilized for bug analysis. Furthermore, Selenium webdriver can auto-take screenshots during execution. But if users are required to capture a screenshot on their own, they are required to utilize the TakeScreenshot method that notifies the WebDrive to take a screenshot & store it at Selenium.
Taking Screenshot in Selenium
To take some screenshots in Selenium, one can follow the basic steps below:
- Cast WebDriver instance to have a TakesScreenshot interface.

- Call the getScreenshotAs() method on the TakesScreenshot interface, stating the kind of output you need e.g. byte array, File, etc.

- Save a variable or file output
Below is an example code snippet in Java language which demonstrates how to take screenshots in Selenium:
// Cast the WebDriver instance to a TakesScreenshot interface
TakesScreenshot screenshotDriver = (TakesScreenshot) driver;
// Call the getScreenshotAs() method to capture the screenshot
File screenshot = screenshotDriver.getScreenshotAs(OutputType.FILE);
// Save the screenshot to a file
FileUtils.copyFile(screenshot, new File(“path/to/screenshot.png”));
In the example above, the WebDriver instance is cast to a TakesScreenshot interface & the getScreenshotAs() method is called to get a screenshot. The screenshot is saved to a file utilizing the FileUtils class from Apache Commons Input Output library.
Note the path/to/screenshot.png needs to be replaced with the path where you need to save your screenshot.
What’s Ashot API?
This is an open-source Java library utilized for taking web page screenshots. It’s a popular alternative to the in-built screenshot functionality offered by Selenium, as it offers more improved features like capturing full-page screenshots plus comparing screenshots for graphic regression testing.
Ashot utilizes the WebDriver API to get web page screenshots, and it offers extra features for customizing screenshots. For instance, it enables one to capture screenshots of particular elements on a page, set the output quality and format plus control the viewport size.
Downloading plus configuring Ashot API?
There are two ways of to configuring the Ashot API
- Utilizing Maven
- Manually minus utilizing any tool
1. Configuring through Maven:
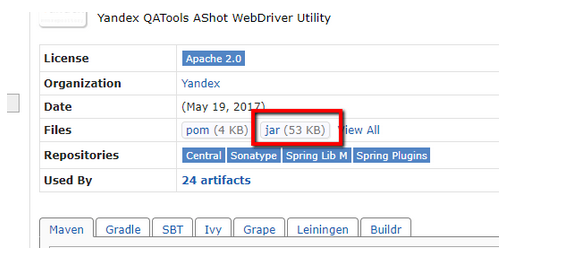
- Open https://mvnrepository.com/artifact/ru.yandex.qatools.ashot/ashot
- Select the latest version
- Copy the Dependency code & add it to pom.xml file

- Save a file, & Maven will add the jar to one’s build path
- And now you’re ready!!!
2. To configure manually without any dependency tool
- Open https://mvnrepository.com/artifact/ru.yandex.qatools.ashot/ashot
- Select the latest version
- Choose the jar, download & save it to your machine

Add jar file in build path
In Eclipse, you need to right-click at the project then go to properties then Build Path > Libraries, and finally at Add External jars
- Choose the jar file
- Apply & Close
- Capture Full Page Screenshots using AShot API
To screenshot a full-page screenshot utilizing AShot API, you could utilize the shootingStrategy method with a ScrollStrategy class to set scroll direction & wait time between every scroll. Below is an example code that shows the ways to capture a complete-page screenshot with the help of AShot:
import ru.yandex.qatools.ashot.AShot;
import ru.yandex.qatools.ashot.shooting.ShootingStrategies;
import javax.imageio.ImageIO;
import java.io.File;
import java.io.IOException;
// Create an AShot instance
AShot ashot = new AShot();
// Set the shooting strategy to scroll the page vertically
ashot.shootingStrategy(ShootingStrategies.viewportPasting(ShootingStrategies
.ScrollDirection.DOWNWARDS));
// Take the screenshot
Screenshot screenshot = ashot.takeScreenshot(driver);
// Save the screenshot to a file
try {
ImageIO.write(screenshot.getImage(), “PNG”, new File(“path/to/screenshot.png”));
} catch (IOException e) {
e.printStackTrace();
}
In the example above we first created an instance of AShot class then set the shootingStrategy method to viewportPasting using ScrollDirection.DOWNWARDS to scroll a page vertically & wait between every scroll.
After setting a shooting strategy, we call the take screenshot method with the WebDriver instance to capture a screenshot. Lastly, we save a screenshot to a file utilizing the ImageIO class.
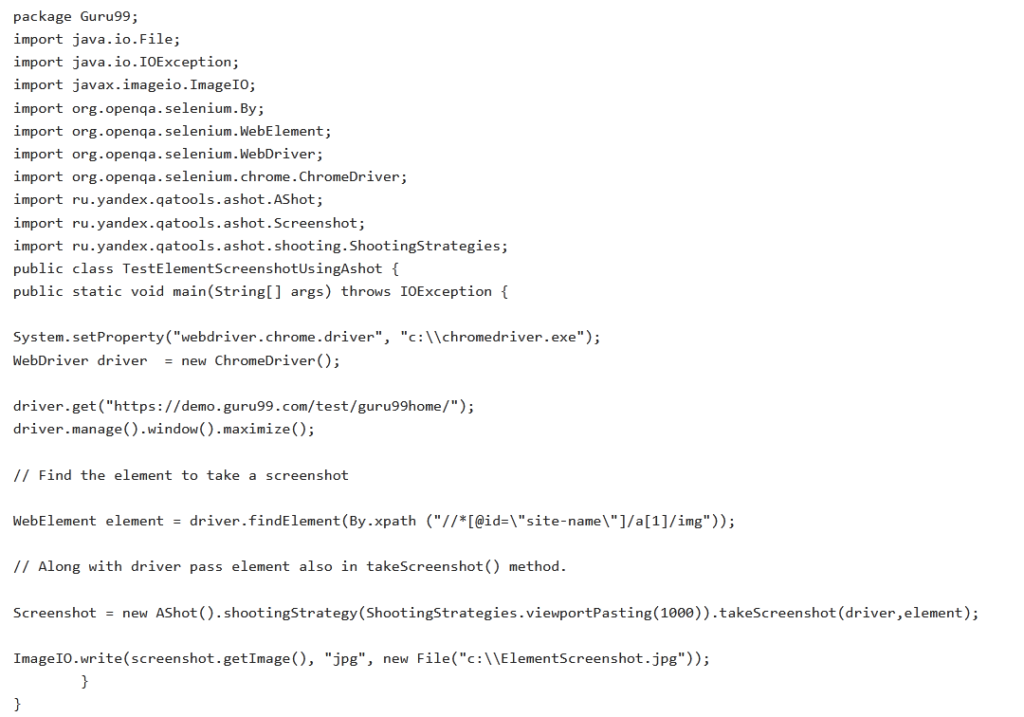
Taking a screenshot of a certain element of a page
To successfully take a screenshot of a certain element on the page utilizing AShot API, you can utilize the coordsProvider method to state the element’s location & size. Below is a code example that shows the way to take a screenshot of a certain element.

Image Comparison utilizing AShot
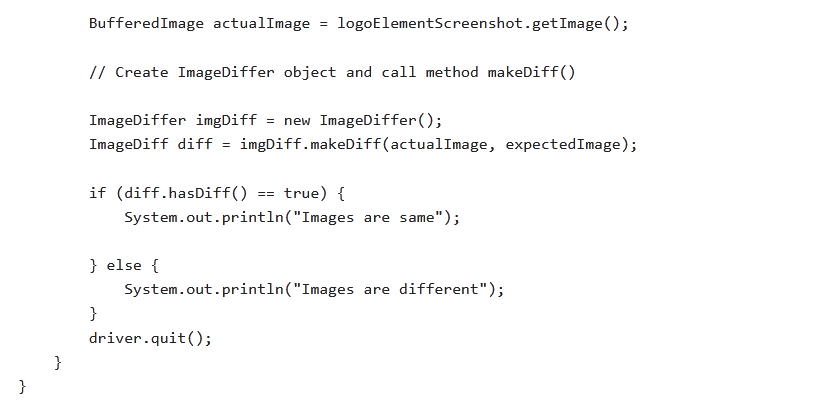
AShot API also offers a method of comparing two images that’s useful for regression testing or visual testing. The ImageDiffer class at AShot can be utilized to compare two pictures plus highlight their differences.
Below is an example code snippet that displays the way to compare two pictures utilizing AShot:


Conclusion
Ashot API is free software from Yandex. Moreover, it’s a Selenium utility for taking screenshots. Ashot API helps one in taking a screenshot of people’s WebElement on various platforms including desktop browsers, Android Emulator Browser, and iOS Simulator Mobile Safari. This takes a page screenshot of a page that’s bigger than its screen size. This feature is removed in version 3 selenium, therefore Ashot API is a suitable option. It will help in decorating the screenshots. It also offers a screenshot comparison.
