Chrome Options & Desired Capabilities are two significant features of Selenium WebDriver which enables one to customize the behavior of the Chrome browser & the WebDriver itself.
Moreover, Chrome Options enables one to configure Chrome browser to operate with certain settings & options. For instance, you can utilize Chrome Options to state the path to Chrome binary, set the default download directory, allow or disable JavaScript, or configure some proxy settings. In addition, Chrome Options are passed to the ChromeDriver instance utilizing the “ChromeOptions” class at Selenium.
On the other hand, Desired Capabilities, are sets of key-value pairs which enable one to configure the WebDriver’s capabilities plus behavior. For instance, you can utilize Desired Capabilities to state the browser name & version, set the operating system and the platform, or disable or enable certain WebDriver features. In addition, Desired Capabilities are passed to the WebDriver instance utilizing the “DesiredCapabilities” class at Selenium.
All Chrome Options & Desired Capabilities are important for modifying the behavior of a Chrome browser plus WebDriver to suit one’s particular testing needs. They’re particularly important when operating with remote WebDriver instances since they allow one to state the capabilities of a remote WebDriver & the browser that’s being utilized.
What’s Chrome Options Class?
Chrome Options refers to a class in Selenium WebDriver that enables one to customize the behavior of a Chrome browser when it’s launched by a WebDriver. Chrome Options class offers a means of setting different Chrome browser options & preferences like the browser window size, proxy server settings, or the download directory.
Below is an example of utilizing Chrome Options to set window size & begin the Chrome browser at headless mode:
ChromeOptions options = new ChromeOptions()
options.addArgument("start-maximized");
ChromeDriver driver = new ChromeDriver(options);
From the above example, we form a new instance of a ChromeOptions class, & then utilize the “arguments ()” method to state that we need to run the browser in headless mode (minus the graphical user interface) & set the window resolution size to 1920×1080 pixels. After that, we pass the ChromeOptions instance to the ChromeDriver constructor to start the Chrome browser with a stated option.
Chrome Options class offers several other options which you can utilize to customize the performance of the Chrome browser, like setting the download directory, configuring proxy server settings, or enabling or disabling JavaScript.
Below we have a list of the available and commonly utilized arguments for ChromeOptions class
- incognito: Opens Chrome at incognito mode
- start-maximized: Opens Chrome at maximize mode
- disable-infobars: Stops Chrome from showing the notification ‘Chrome is controlled using automated software
- headless: Opens Chrome in headless mode
- disable-extensions: Deactivates existing extensions in the Chrome browser
- make-default-browser: Activates Chrome to the default browser
- disable-popup-blocking: Deactivates pop-ups displayed in the Chrome browser
- version: Prints the version of Chrome browser
Desired Capabilities class
Desired Capabilities refers to a class in Selenium WebDriver that enables one to state the capabilities & behavior of a WebDriver instance. Desired Capabilities class offers a means of setting different WebDriver options & preferences like the browser name & version, JavaScript, or platform execution settings.
Below we have an example of utilizing Desired Capabilities to state the browser name & version, and begin the Chrome browser:
// Create an object of desired capabilities class with Chrome driver
DesiredCapabilities SSLCertificate = DesiredCapabilities.chrome();
// Set the pre defined capability – ACCEPT_SSL_CERTS value to true
SSLCertificate.setCapability(CapabilityType.ACCEPT_SSL_CERTS, true);
// Open a new instance of chrome driver with the desired capability
WebDriver driver = new ChromeDriver(SSLCertificate);
From the above example, we make a new instance of DesiredCapabilities class & then utilize the “setCapability()” method to state that we need to utilize the Chrome browser using version 91.0. After that, we pass the DesiredCapabilities instance to the RemoteWebDriver constructor to begin the WebDriver instance.
Desired Capabilities class offers other several options which you can utilize to customize the conduct of a WebDriver like setting a platform, stating the browser binary path, or activating or deactivating JavaScript execution. Moreover, Desired Capabilities are very important when operating with remote WebDriver instances since they enable one to state the capabilities of a remote WebDriver & the browser being utilized.
Below are more commonly utilized pre-defined capability varieties.
- ACCEPT_SSL_CERTS: This property informs the browser to accept the SSL Certificates automatically
- PLATFORM_NAME: This property is utilized in setting the operating system platform utilized to access a website
- BROWSER_NAME: It’s used in setting the browser name of a web driver instance
- VERSION: It’s utilized to set a browser version
Chrome Options for Adblocker Extension
Adblocker extension of a Chrome browser is handled utilizing ChromeDriver Options & Desired Capabilities class. Below we have the steps used in accessing the AdBlocker extension on a Chrome browser utilizing Desired Capabilities class.
Step One) AdBlocker extension needs to be installed on the Chrome browser before utilizing the Chrome Options class
Step Two) Extracts CRX File which corresponds to the AdBlocker extension via http://crxextractor.com/
Step Three) Pass the downloaded CRX File path in the Chrome Options class
Step Four) Instantiate a web driver utilizing desired capabilities class & Chrome Options at the Selenium object
Example:
Below we have examples that show the way you can activate an ad blocker extension to the Chrome browser utilizing Desired Capabilities and Chrome Options class.
ChromeOptions options = new ChromeOptions();
options.addExtensions(new File("Path to CRX File"));
DesiredCapabilities capabilities = new DesiredCapabilities();
capabilities.setCapability(ChromeOptions.CAPABILITY, options);
ChromeDriver driver = new ChromeDriver(capabilities);
Extract CRX File
Below are the steps used in demonstrating the procedure of extracting CRX Files via Ad Blocker through a website
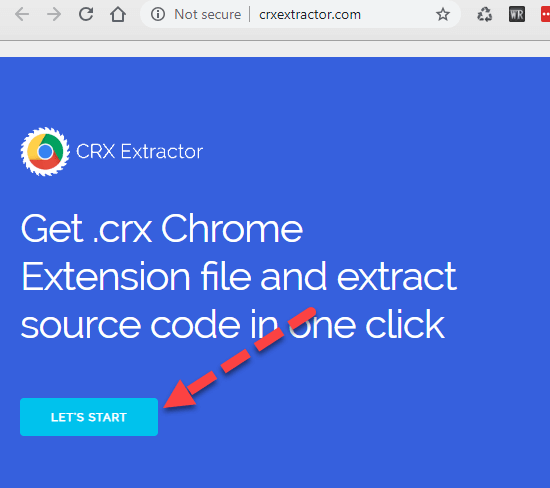
Step One) Open http://crxextractor.com/ & choose a start button

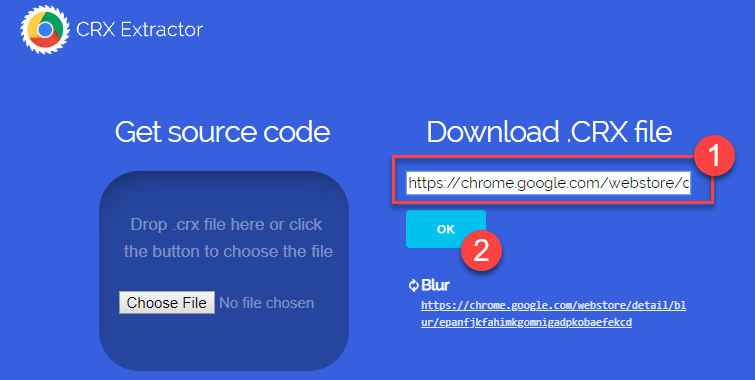
Step Two) Key in the Chrome extension – Ad Blocker URL below the textbox. Adblock URL at Chrome web store is https://chrome.google.com/webstore/detail/adblock-%E2%80%94-best-ad-blocker/gighmmpiobklfepjocnamgkkbiglidom
& click ok

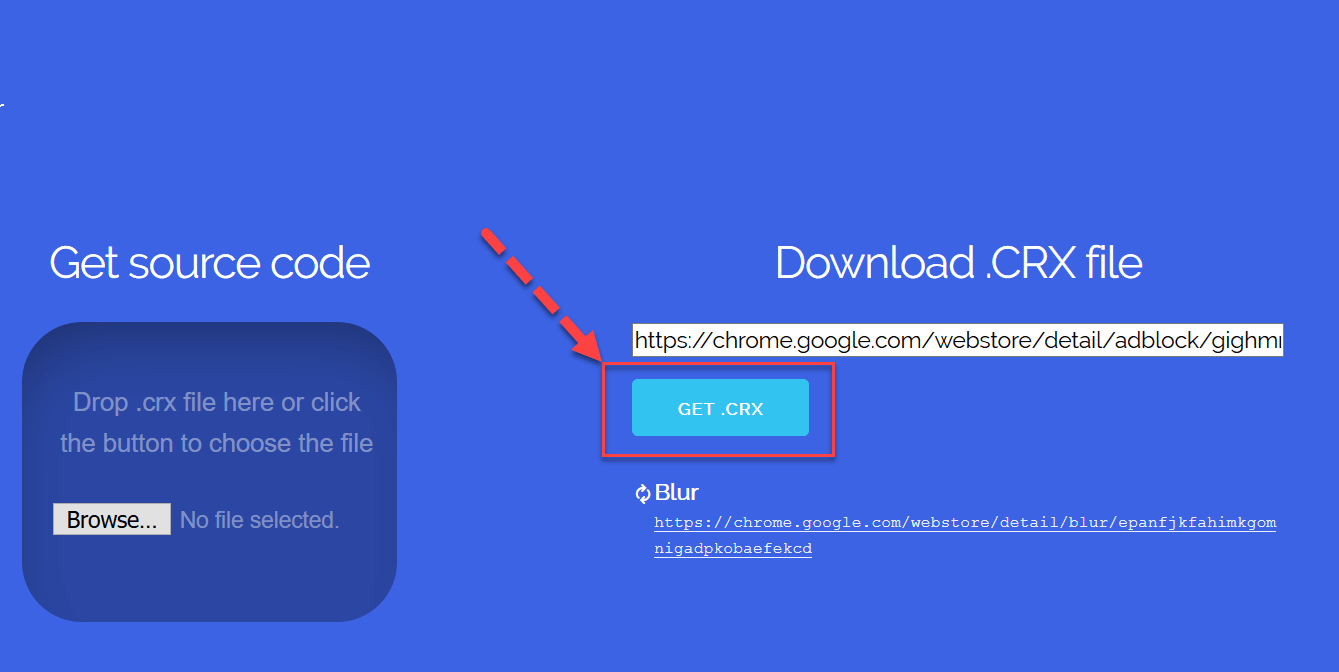
Step Three) Clicking the OK Button, the label of the button changes to Get.CRX is shown below. Click at Get. The CRX button and CRX file correspond to the extension which will be downloaded

Step Four) Save a file to the local machine and make a note of the path saved. The following step is passing the saved path toward the Chrome Options class
Code
With AdBlocker extension enabled on Chrome browser, ads should be disabled
package adblock;
import java.io.File;
import org.openqa.selenium.chrome.ChromeDriver;
import org.openqa.selenium.chrome.ChromeOptions;
import org.openqa.selenium.remote.DesiredCapabilities;


public class AdblockDemo {
public static void main(String[] args)  {

	System.setProperty("webdriver.chrome.driver","X://chromedriver.exe");
	ChromeOptions options = new ChromeOptions();
	options.addExtensions(new File("X://extension_3_40_1_0.crx"));
	DesiredCapabilities capabilities = new DesiredCapabilities();
	capabilities.setCapability(ChromeOptions.CAPABILITY, options);
	options.merge(capabilities);
	ChromeDriver driver = new ChromeDriver(options);
	driver.get("http://demo.guru99.com/test/simple_context_menu.html");
	driver.manage().window().maximize();
	//driver.quit();
	}

}
Explanation
- Initially, you require to set a path to the chromedriver.exe file utilizing the set property method since you’re utilizing Chrome Browser for testing
- One requires setting a path to CRX File for adding extensions method
- Then you require to form an object of Chrome Desired Capabilities at the Selenium class & pass it to the web driver instance. That is, from Selenium 3.8.1 version, the driver capabilities class is denounced and one requires to merge the capabilities object using the Chrome Options object before you pass the same like an argument to the Chrome Driver constructor
- Go to this URL – http://demo.guru99.com/test/simple_context_menu.html using an Ad Blocker extension activated
- Maximize & close the browser
Remember we are activating the AdBlocker extension on the Chrome browser via automation script instead of enabling the Adblocker extension on the Chrome browser manually. CRX File is a means of accessing the ad blocker extension utilizing an automation script
Output
Chrome will be activated using the AdBlocker extension allowed as below minus any ads
Incognito mode for Chrome Options
Chrome Options is utilized for incognito mode through utilizing the pre-defined argument –incognito.
Below we have a sample code for accomplishing the same.
Code
package test;
import java.io.File;
import org.openqa.selenium.chrome.ChromeDriver;
import org.openqa.selenium.chrome.ChromeOptions;
import org.openqa.selenium.remote.DesiredCapabilities;

public class Incognito{
public static void main(String[] args) {
	// TODO Auto-generated method stub
	System.setProperty("webdriver.chrome.driver","X://chromedriver.exe");
	ChromeOptions options = new ChromeOptions();
	options.addArguments("--incognito");
	DesiredCapabilities capabilities = new DesiredCapabilities();
	capabilities.setCapability(ChromeOptions.CAPABILITY, options);
	options.merge(capabilities);
	ChromeDriver driver = new ChromeDriver(options);
	driver.get("http://demo.guru99.com/test/simple_context_menu.html");
	driver.manage().window().maximize();
	//driver.quit();
	}
	}
Explanation
- Firstly, you require to set a path to a chromedriver.exe file utilizing the set property method since you’re utilizing Chrome Browser for testing
- After that, you need to make an object of the Chrome Options class & pass it to the web driver instance. Meanwhile, we need to open Chrome browser in incognito mode, you require to pass an argument –incognito in the Chrome Options class.
- Next, form an object of Desired Capabilities class & merge Desired Capabilities class object using the Chrome Options class object utilizing the merge method
- You require to make an object of the Chrome Driver class & pass the Chrome Options object as an argument
- Lastly, we require to pass a URL – http://demo.guru99.com/test/simple_context_menu.html to the driver.get method
- Maximize & exit the browser
Output
A Chrome browser window will open in Incognito mode as shown below
Headless Chrome for Chrome Options
A Headless browser operates in the background. You’ll not view the browser GUI or operations that have been done on it.
Chrome Options for operating Chrome browser at headless mode is accomplished through utilizing a predefined argument –headless.
The sample code for accomplishing it is displayed below.
Example
package test;
import java.io.File;
import org.openqa.selenium.chrome.ChromeDriver;
import org.openqa.selenium.chrome.ChromeOptions;
import org.openqa.selenium.remote.DesiredCapabilities;


public class HeadlessModeDemo {
	public static void main(String[] args) {
		// TODO Auto-generated method stub
		System.setProperty("webdriver.chrome.driver","X://chromedriver.exe");
		ChromeOptions options = new ChromeOptions();
		options.addArguments("--headless");
		DesiredCapabilities capabilities = new DesiredCapabilities();
		capabilities.setCapability(ChromeOptions.CAPABILITY, options);
		options.merge(capabilities);
		ChromeDriver driver = new ChromeDriver(options);
		driver.get("http://demo.guru99.com/");
		driver.manage().window().maximize();
		String title = driver.getTitle();
		System.out.println("Page Title: " +title);
		driver.quit();
		}


}
Explanation
First, you require to set the path to the chromedriver.exe file utilizing the set property method because you’re utilizing Chrome Browser for testing
After that, make Chrome Options class object & pass it to an instance of a web driver. Since we need to open the Chrome browser in headless mode, we require to pass an argument –headless in the Chrome Options class.
Make the DesiredCapabilities Chrome class object & merge this Desired Capabilities class object with the Chrome Options class object utilizing the merge method
Make Chrome Driver class object and pass Chrome Options Selenium object like an argument
Then, we require to pass a URL – http://demo.guru99.com/ to the driver.get method
Print a page title & exit the browser
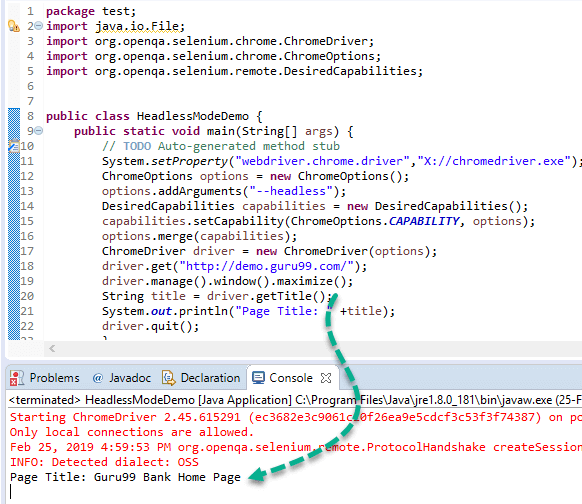
Output
The browser won’t be visible for the code above since Chrome will be operating in Headless mode. The page title will be fetched & displayed as shown below.

Conclusion
Selenium Chrome Options class is utilized to manipulate different Chrome driver properties. Moreover, Desired Chrome Capabilities class offers a set of key-value pairs to improve individual properties of the web driver like the browser platform, browser name, etc. To manipulate every Chrome browser extension, CRX File corresponds to an extension that needs to be extracted and needs to be added to the Chrome Options class. In addition, incognito & –headless are pre-stated arguments offered by the Chrome Options class for utilizing Chrome browser in incognito mode & headless mode.

