When you connect your Windows 10 device to a network, it will name it automatically depending on the type, i.e., Ethernet or Wi-Fi. However, users can easily change the network adapter name to suit their interests. For instance, changing the name to your nickname or business name. No need to worry about renaming your network adapters, but if you’ve several network adaptors, then naming each will make them easily identifiable and manageable. This page will discuss how to name network adapters on Windows 10 using PowerShell and the control panel.
Change network adapter name on Windows 10

To change the network adapter on Windows 10 through the Control Panel window, follow the steps below;
- Press the Windows Logo Key and type Control panel
- Click on Control Panel App from the listed results
- Tap the Network and internet option
- Navigate to Network and Sharing center
- On the left pane, choose Change adapter settings
- Right-click the network adapter (Ethernet or Wi-Fi) that you want to rename
- Scroll down to Rename option
- Type the new name for your network adapter and hit the enter keyboard
After completing these steps, the new name will be applied to your network adapter in windows 10
Change the network adapter name from PowerShell.

If you love writing some codes, then using PowerShell on windows 10 to rename your network adapter is ideal. Use the steps below to achieve this task.
- Press the Windows logo key
- Type PowerShell and choose the Run As Administrator option
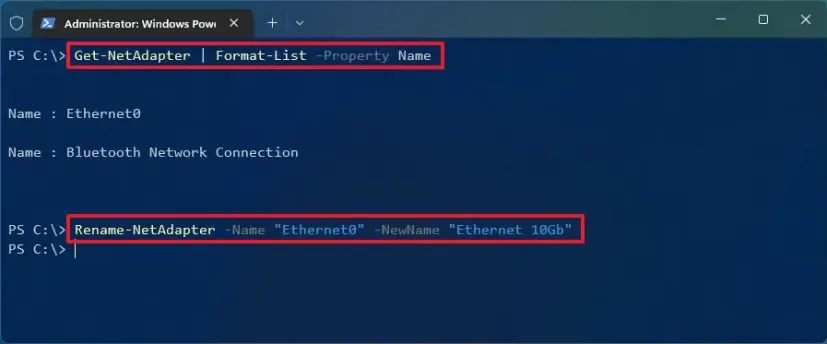
- On the PowerShell window, type Get-NetAdapter | Format-List -Property Name
- Hit the enter button to view all the network adapters on your PC
- To rename the Ethernet or Wi-Fi adapters, type Rename-NetAdapter -Name “OLD-NAME” -NewName “NAME-NAME” and press Enter. In this command line, change OLD-NAME with the current Wi-Fi or Ethernet adapters name. Also, substitute NEW-NAME with the name you need to assign the network adapter. For instance, the above command can be written as Rename-NetAdapter -Name “Ethernet” -NewName “Ethernet mantisa.”
After completing these steps in windows 10 inbuild PowerShell App, the new name will be applied to your network adapter. In this way, you can easily differentiate between your network adapters.
We are not affiliated/associated with Microsoft who own Windows. “Windows” is a trademark of Microsoft Corporation.
The information contained on this website is for general information purposes only and any reliance you place on such information is strictly at your own risk.
Contact Microsoft Office
| India | +91 N/A N/A | (0)80 4010 3000 1 800 572 1100 1 800 102 1100 |
| United States | +1 +1 | (800) 642 7676 (800) 892 5234 (TTY) |


